Capturing a screenshot on your iPhone 16 is a straightforward task, but with the latest advancements in technology, it’s important to know the most efficient methods available. This detailed guide will show you how to take screenshot on iPhone 16 to maximize your device’s features.
The iPhone 16, like its predecessors, offers several ways to capture what’s on your screen. Whether you need to save a fleeting moment, capture an important message, or share a visual from an app, mastering these techniques will streamline your user experience.

Several method to take screenshot on iPhone 16
To take a screenshot on an iPhone 16, you can use one of the following methods:
Using the physical button
The most common method to capture a screenshot on the iPhone 16 involves using the physical buttons on the device. This method is quick and efficient, making it ideal for capturing spontaneous moments.
Steps to take a screenshot with Physical Buttons:
- Locate the buttons: On the iPhone 16, the screenshot function utilizes both the Side Button and the Volume Up Button.
- Press Simultaneously: Quickly press and hold the Side Button and the Volume Up Button at the same time. Make sure to press both buttons simultaneously to avoid issues with the screenshot capture.

- Release and Capture: Release both buttons. You will see a flash on the screen and hear a shutter sound, indicating that the screenshot has been successfully captured.
- View and Edit: The screenshot will appear as a thumbnail in the lower-left corner of your screen. To view and edit the screenshot immediately, tap it, or swipe left to dismiss it. You can also access the screenshot later in the Photos app, under the “Screenshots” album.
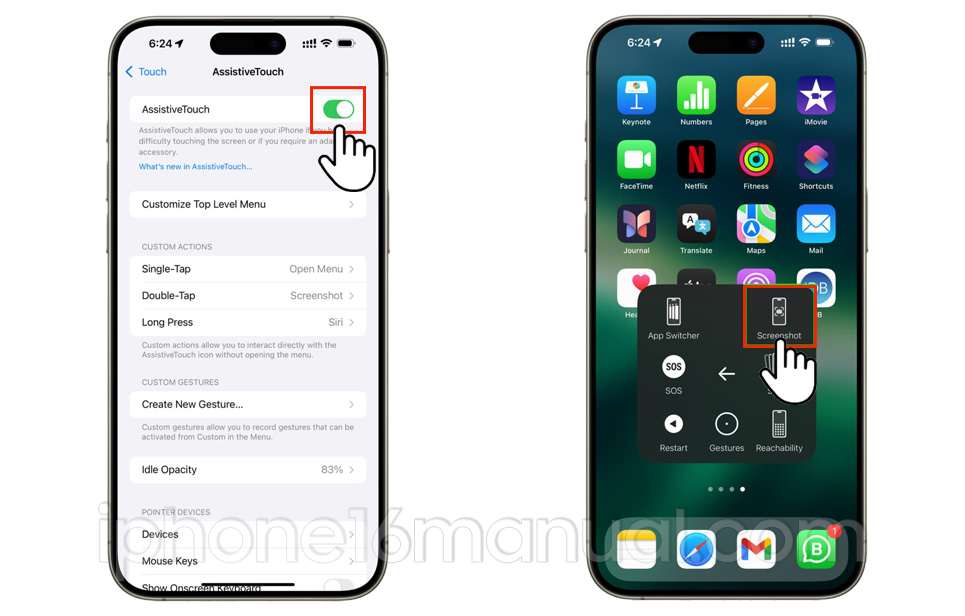
Using AssistiveTouch
For users who prefer a more accessible option, especially those with physical limitations, AssistiveTouch offers an alternative way to take screenshots on your iPhone without using physical buttons.
Enabling and Using AssistiveTouch
- Enable AssistiveTouch: Go to Settings > Accessibility > Touch > AssistiveTouch and turn the switch on. This will place a floating button on your screen.
- Open the AssistiveTouch menu: Tap the floating AssistiveTouch button.
- Select Device: In the menu that appears, select the Device option.
- Take Screenshot: Tap More, then select Screenshot. The device will capture the screenshot using the AssistiveTouch menu.
Using Siri to take screenshot on iPhone 16
The iPhone 16 supports voice commands through Siri, which can be a convenient way to capture screenshots hands-free.
- Steps to Use Siri for Screenshots: To activate Siri, either say “Hey Siri” or press and hold the Side Button.
- Give Command: Once Siri is active, say, “Take a screenshot.”
- Confirmation: Siri will capture the screenshot and provide a confirmation, and the screenshot will be saved in the Photos app as usual.
Editing and Annotating Screenshots
After capturing a screenshot, you may want to annotate or edit it to highlight important information or add personal notes.
Accessing Editing Tools
- Open Screenshot: Tap on the thumbnail that appears after taking the screenshot, or locate the image in the Photos app.
- Edit: In the upper-right corner of the screen, tap Edit.
- Tools: Use the available tools to crop, adjust color, add text, or draw on the screenshot. These options can enhance the clarity and impact of the captured image.
Screenshots are organized and shared.
To keep your screenshots organized and share them effectively, follow these guidelines:
Organizing Screenshots
- Albums: In the Photos app, create specific albums to categorize screenshots by project, event, or any other criterion.
- Deleting Unnecessary Screenshots: Regularly review and delete screenshots that are no longer needed to avoid clutter and free up storage space.
Sharing Screenshots
- Direct Sharing: Open the screenshot in the Photos app, tap the share icon, and choose your preferred method for sharing, such as messaging apps, email, or social media.
- Saving to Files: For better organization, you can save screenshots to the Files app by tapping Save to Files in the share menu. This option allows for more precise organization and access from multiple devices.
Advanced screenshot techniques
For those looking to explore more advanced screenshot options on the iPhone 16, consider the following features:
Long Screenshots
The iPhone 16 allows for long screenshots, particularly for capturing entire web pages or lengthy documents.
- Capture the Initial Screenshot: To capture the first part of the content, follow the standard screenshot method.
- Select Full Page: When the screenshot preview appears, tap Full Page at the top of the screen.
- Save or Share: The entire scrollable content can be saved or shared as a PDF file.
Using Third-Party Apps
Several third-party applications are available that offer enhanced screenshot capabilities, such as advanced editing tools, cloud storage integration, and more.
- Explore Apps: Browse the App Store for reputable screenshot and screen recording apps.
- Install and Configure: Download and set up the app according to your preferences and needs.
- Utilize Features: Leverage additional features such as screen recording, extended editing options, and direct cloud sharing.
Conclusion
Mastering the art of taking screenshots on the iPhone 16 ensures that you can efficiently capture and share important information with ease. By utilizing the various methods and tools outlined in this guide, you can enhance your productivity and streamline your digital workflow. Whether using physical buttons, AssistiveTouch, Siri, or advanced screenshot techniques, the iPhone 16 offers versatile options to meet your needs.
2 thoughts on “How to Screenshot on iPhone 16: A Comprehensive Guide”